The 18 Hole Course
| Yards | Rating | Slope | |
|---|---|---|---|
| Blue | 6411 | 74.1 | 126 |
| White | 6111 | 69.9/75.9 | 123/131 |
| Gold | 5507 | 67.0/72.5 | 118/125 |
| Red | 5157 | 65.5/70.7 | 114/120 |
The 18 Hole Course Descriptions
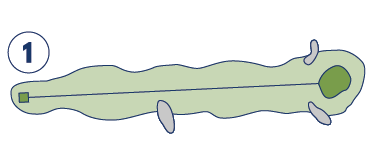
Hole 1
A good starting hole with no surprises. Although there is OB, left a center left tee shot is a good spot. A valley bisects the fairway from 150-100 yards from the green. A large swale fronting the green collects approach shots that land short. The left side of the fairway is the best angle to the green. Putts from the back of the green break left to right and are sneaky fast. The short (red) pin is the tough one here.
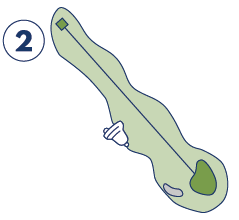
Hole 2
A blind tee shot to a sunken fairway gets your attention right away. A left center tee shot will funnel to the right, OB left. One trap front right is hard to see from the fairway. Three large pine trees discourage missing the green left. A large green with no big breaks, gives you a chance for a birdie here. The back (blue) pin is hard to find.
Hole 3
Accuracy trumps distance here. Errant drives to the right will deflect into a grove of trees, almost guaranteeing a bogey or worse. Any drive right of the large hickory tree to the left side is OK. This green is basically a mesa with steep sides, right and left. Misses to the left or right leave a difficult chip shot, short here is the place to miss the green. Downhill putts on this hole are slippery.
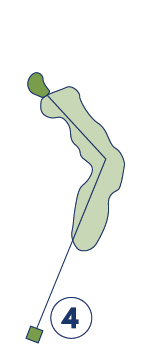
Hole 4
Wind conditions vary club selection significantly. Two bunkers left of the green are difficult to make par from. Most difficult green on the front nine, slopes severely back to front. Uphill putts and chip shots are not all bad.
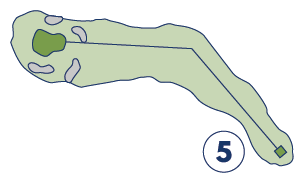
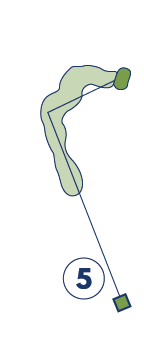
Hole 5
No short cuts on this dogleg left. A right-center tee shot gives you the best angle to the green, a tee shot on the left side will be blocked out. Two bunkers bracket the fairway 20 yards short of the green, two more green side traps left and right. Given the huge carry the second shot requires, the smart shot may be to lay up inside 100 yards. A par feels like a birdie, 5 is a good score here.
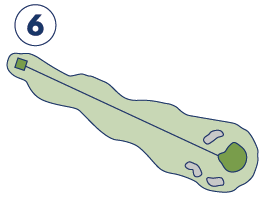
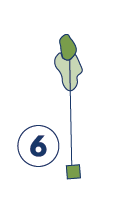
Hole 6
The first half of this hole is up-hill, the second half is down-hill. The left side of the fairway gives the best angle to the green, be careful of the hickory tree on the corner, it may jump out and knock your tee ball down. Green is protected by three bunkers, again the best position is to be below the hole.
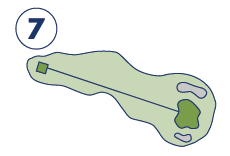
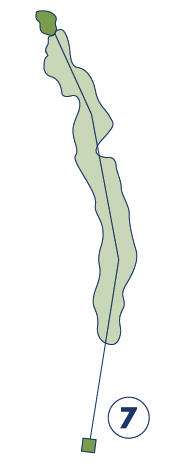
Hole 7
This downhill par 3 plays every bit of its 200 yards. The hill-top tee is exposed to wind from all sides. Club selection can vary significantly on this hole. The large green side bunker on the left gets most of the action. A tough sand shot to the elevated green from there. The best miss here is short right. This fairly flat green will surrender birdies.
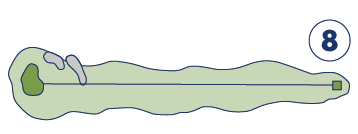
Hole 8
A long par five with OB left and trees lining both sides of the fairway. A drive up the left side will curl back to the fairway. If your tee shot is short of the directional flag (most of ours are), hit your second shot on that line. The left side of the fairway affords the best angle to the smallest green on the golf course. Short is better than long here.
Hole 9
The OB left is closer than it looks. There are 6 traps on this hole that will collect any off line shots. The best miss is the landing area just short of the green, although long isn’t very penalizing. This largely flat green allows for some long holed putts.
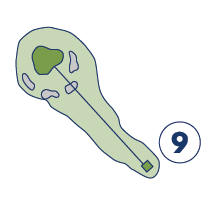
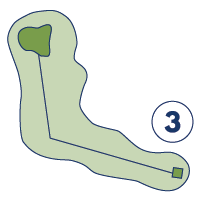
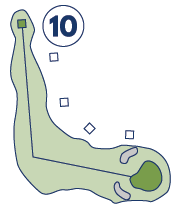
Hole 10
Job #1 is getting the green in sight on this 90 degree dogleg. Give yourself a little room to the right on the tee shot. OB Right and left (left OB is on your tee shot only). Another difficult green especially if you are behind the pin. Being short of the green is preferable to either bunker shot. A 4 is a great score here and 5 isn’t bad.
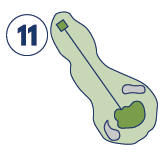
Hole 11
Don’t take this short par 4 for granted, it is a birdie hole but you can make double bogey just as easily. Two traps flank the hole left and right. Trees on the right all the way to the hole. A drive missed right leaves a very difficult shot to a very small landing area. The green slopes right to left significantly. Play for par and you will have a chance at birdie
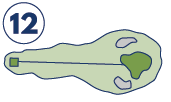
Hole 12
This ridge top tee is windblown from all directions. OB far left and behind the green. Red staked wet-land on the right. A big maple tree halfway down the fairway will deflect pulled tee shots in all directions. The large green features subtle breaks on the front half, the back half is fairly flat. Many players use the same club here that they used on #7.
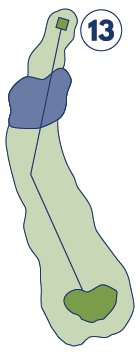
Hole 13
OB on the entire left side. Fairway slopes quite a bit to the left. The ideal tee shot is center right and will funnel to the left. Use the large hickory tree to the right of the green as your aiming spot with your second shot. This large green has a distinct right to left break as you face the green. Putts from the back of the green are all down grain and faster than they look.
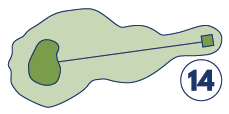
Hole 14
Depending on the pin placement and wind direction, club selection here can vary by 4 clubs. OB left and trees come into play half way to the green. This uphill hole requires that shots carry all the way to the green. This tiered green is the largest on the course. Red and white flags are on the first level, blue flags on the back.
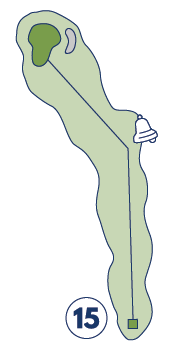
Hole 15
Our signature hole. Tee shot will be affected by wind, OB left. The tee shot is blind down into a valley. It’s all uphill from here. The landing zone in front of the green might be 10 feet, missing the green left is bad and missing it right is worse. The prudent shot might be 10-20 short of the green. This will give you the best opportunity to keep the ball below the hole. You don’t want to be long/above the hole.
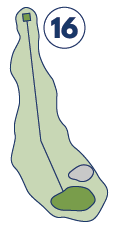
Hole 16
OB left. Any tee shot on line with the directional flag or just right of it is good. The prevailing right to left wind can knock an approach shot out of the air in a heartbeat. The long kidney shaped green is replete with many subtle breaks. Being exposed to the wind makes this green faster than it looks.
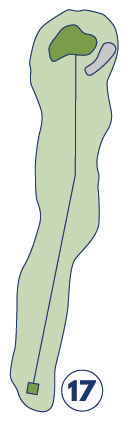
Hole 17
OB left and tree right all the way to the green. A drive past the hickory tree in the fairway is a good start. Second shots will bounce a little to the right, be careful not to cut it too close, your 3rd shot will be blocked out by all the trees. One deep bunker to the right. Bi-level green will test your green reading ability. Putts from back to front are downhill and quick.
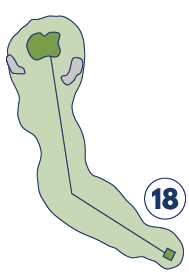
Hole 18
OB Right and trees line both sides of the fairway. The long ball hitter can cut a little off the dogleg and shorten the hole. OB comes into play just right of the green. Two traps one front right and one greenside left. The green is steeply sloped back to front. Approach shot hitting a downslope short of the green can propel ball to the top or over the green.

The Glacial Nine Course
| Yards | Rating | Slope | |
|---|---|---|---|
| Blue | 3227 | 35.0 | 122 |
| White | 3003 | 33.7 | 116 |
| Gold | 2452 | 32.4/34.5 | 111/120 |
| Red | 2341 | 32.9 | 116 |
The Glacial Nine Hole Descriptions
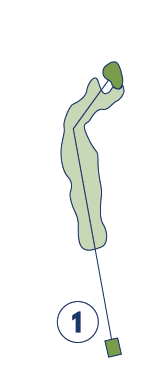
Hole 1
The prevailing wind is usually at your back on this down-hill, dog-leg right par 4. Two unsighted traps flank the right side at the dog leg. Another trap looms greenside, left front. The bad miss off the tee is right as trees block out the green. The large bi-level green will challenge your putting stroke.
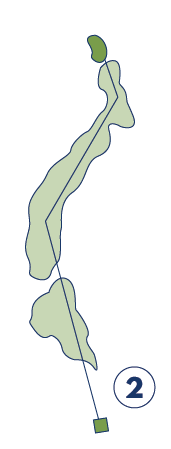
Hole 2
OB far left all the way to the hole. This long double dog-leg starts with a blind tee shot uphill. The 2nd shot is challenged by large bunkers right and left at the 100 yd dish. An abrupt elevation change makes approach shots uphill to an elevated mesa-like green. The large, fairly flat green is par and birdie friendly.
Hole 3
Take 1 or 2 clubs more as the wind is usually in your face on this par 3. The largest trap on the property gobbles up all shots that miss the green right. The large green slopes back-to-front. The downhiller is quick. Par is a good score here.

Hole 4
It’s a downhill tree shot on this scenic, dog-leg left par 4. Thick woods line the fairway all the way to the green. Take enough clubs as the approach is uphill. The green is two-tiered which creates interesting putts if you are on the wrong level.
Hole 5
OB left tee to green. A yawning hazard consumes tee shots that miss right. Just right of the oak tree in the fairway is the best place for this downhill tee shot. One trap guards the green front-right. This plateau green is fairly flat. Course management trumps distance here to create a good birdie opportunity.
Hole 6
The prevailing wind can’t be felt on the tee. Tee shots will be hit by the wind halfway to the hole. It’ll be one or two clubs more if the wind is blowing. The large green slopes back to front and left to right. The OB right should not be in play.
Hole 7
This big double dog-leg par 5 has a water hazard to the right of the tee. Two huge traps flank the fairway at the dog-leg. Anyone who gets home in two here has their name on their golf bag. This large slightly elevated green features a severe right-to-left slope. Par feels like a birdie here.
Hole 8
You’re at the highest point of the course. After you’ve taken in the view, take a look at the flag to see if the wind at the green is the same as the tee. It may not be. Take enough clubs to fly the two traps, front and right of the green. Another trap covers long shots on the high side. The large-sloped green has big breaks and is very fast, back-to-front.

Hole 9
OB left tee-to-green. Water hazard right off the tee. Two large bunkers flank the green on the left. Take enough clubs to fly these traps. This green has two distinct levels and is very fast, back-to-front.

Golf Practice Facilities
Quit Qui Oc offers chipping and putting areas, and it is the perfect place to improve your short game.
Quit Qui Oc is also equipped with a driving range and PGA staff available for lessons. What better way to take your game to the next level this year? Make time to perfect your swing and improve your golf game today. Just contact our pro shop to speak with our professional staff and schedule your lesson.
